Friday, May 6, 2016

GPS Location Programaticaly in Android by tuning ON GPS

There are various examples on internet which shows how to get GPS location of a device in Android using code. Its fairly simple to get location when GPS is turned on but its little bit tricky when GPS is turned off. Majority of examples found on internet exploit a bug in Android to turn on GPS. This hack used to work pre Kitkat (4.4) but it stopped working now. 
Following is the code to exploit this hack -


private void turnGPSOn(){
    String provider = Settings.Secure.getString(getContentResolver(), Settings.Secure.LOCATION_PROVIDERS_ALLOWED);

    if(!provider.contains("gps")){ //if gps is disabled
        final Intent poke = new Intent();
        poke.setClassName("com.android.settings", "com.android.settings.widget.SettingsAppWidgetProvider"); 
        poke.addCategory(Intent.CATEGORY_ALTERNATIVE);
        poke.setData(Uri.parse("3")); 
        sendBroadcast(poke);
    }
}

Then, there is few examples which just open the Android Settings page and then user has to toggle GPS settings, following is the code to launch settings page -


Intent intent=new Intent("android.location.GPS_ENABLED_CHANGE");
intent.putExtra("enabled", true);
sendBroadcast(intent);

Couple of months back, google introduced a standard way of asking user to turn on GPS by showing following dialog to user -


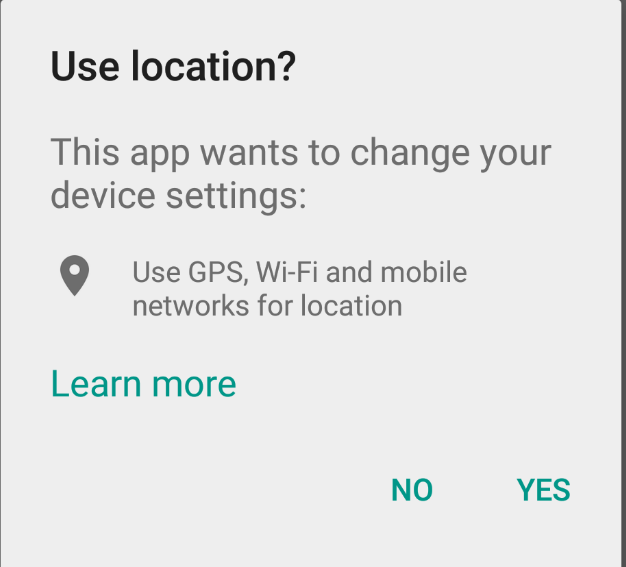
GPS is automatically turned on if user says 'Yes'.  No need to open Settings page and then ask user to toggle GPS setting. Majority of standard apps use this method now. Ola, Uber and other gps location based cab booking apps use this method too.

In this blog post I will explain how to use this method and the I will explain how to use Geocoder class to get complete address from location longitude and latitude. Please note that -

  • To use GPS, internet is not required i.e. longitude and latitude can be obtained even when device is not connected to internet.
  • To get address from longitude and latitude, internet is required.

Following is step by step process of getting Android device location programatically by turning on GPS -


Step 1 - Create a Custom LocationListner which helps in listening to locations changes.


  • This can be done by implementing LocationListener  class. 
  • Then Geocoder class can be used to get address info from location. Geocoder class can provide following important properties encapsulated in Address object -
String mAdminArea;
String mSubAdminArea;
String mLocality;
String mSubLocality;
String mThoroughfare;
String mSubThoroughfare;
String mPremises;
String mPostalCode;
String mCountryCode;
String mCountryName;
double mLatitude;
double mLongitude;
  • Following is a sample implementation of LocationListener  class -


private class MyLocationListener implements LocationListener {
        @Override
        public void onLocationChanged(Location loc) {
            String cityName="";
            Geocoder gcd = new Geocoder(getBaseContext(),Locale.getDefault());
            List<Address> addresses;
            try {
                addresses = gcd.getFromLocation(loc.getLatitude(), loc.getLongitude(), 1);               
                cityName=addresses.get(0).getLocality();
            }
            catch (IOException e) {
                e.printStackTrace();
            }

            textView.setText("Lat: " +loc.getLatitude() +"\n"+ " Lng: " + loc.getLongitude()
                    +"\nMy Currrent City is: "+cityName);
        }

        @Override
        public void onProviderDisabled(String provider) {
            // TODO Auto-generated method stub
        }

        @Override
        public void onProviderEnabled(String provider) {
            // TODO Auto-generated method stub
        }

        @Override
        public void onStatusChanged(String provider,
                                    int status, Bundle extras) {
            // TODO Auto-generated method stub
        }
    }


Step 2 - Check whether GPS is turned ON


  • If GPS is turned ON, then add LocationListener created in Step 1.
  • If GPS is not turned ON, then show a dialog to user.


public void requestToTurnOnGps()
    {
        GoogleApiClient googleApiClient = new GoogleApiClient.Builder(getApplicationContext())
                .addApi(LocationServices.API)
                .build();
        googleApiClient.connect();

        LocationRequest locationRequest = LocationRequest.create();
        locationRequest.setPriority(LocationRequest.PRIORITY_HIGH_ACCURACY);
        locationRequest.setInterval(30 * 1000);
        locationRequest.setFastestInterval(5 * 1000);
        LocationSettingsRequest.Builder builder = new LocationSettingsRequest.Builder().addLocationRequest(locationRequest);
        builder.setAlwaysShow(true); //DO NOT forget this, this is the key ingredient

        PendingResult<LocationSettingsResult> result =
                LocationServices.SettingsApi.checkLocationSettings(googleApiClient, builder.build());
        result.setResultCallback(new ResultCallback<LocationSettingsResult>() {
            @Override
            public void onResult(LocationSettingsResult result) {
                final Status status = result.getStatus();
                final LocationSettingsStates state = result.getLocationSettingsStates();
                switch (status.getStatusCode()) {
                    case LocationSettingsStatusCodes.SUCCESS:
                        //this means gps is already turned ON
                        startListeningLocationUpdates();
                        break;
                    case LocationSettingsStatusCodes.RESOLUTION_REQUIRED:
                        //this means gps is turned off and you need to show the dialog
                        try {
                            status.startResolutionForResult(MainActivity.this, REQUEST_CHECK_SETTINGS);
                        } catch (IntentSender.SendIntentException e) {
                            // Ignore the error.
                        }
                        break;
                    case LocationSettingsStatusCodes.SETTINGS_CHANGE_UNAVAILABLE:
                        textView.setText("Looks like GPS is not available in your device.");
                        break;
                }
            }
        });
    }

private void startListeningLocationUpdates() {
        try {
            textView.setText("Searching for location...\n It might take some time. Please wait ...");
            locationListener = new MyLocationListener();
            locationManager.requestLocationUpdates(LocationManager.GPS_PROVIDER, 0, 0, locationListener);
        }
        catch (SecurityException e)
        {
            textView.setText("No permission to use GPS.");
        }
    }


Following line will launch a dialog to the user with Yes and No options. Result of the dialog i.e. user choose 'Yes' option or 'No' option will be given as onActivityResult with status code passed as second parameter (REQUEST_CHECK_SETTINGS).

status.startResolutionForResult(MainActivity.this, REQUEST_CHECK_SETTINGS);


Step 3 - Handle result of GPS turn ON\OFF dialog shown to user


  • If user said Yes, then GPS must be enabled now. React accordingly.
  • If user said No, then GPS should still be disabled. Handle this case.
  • Following is sample implementation -

@Override
    protected void onActivityResult(int requestCode, int resultCode, Intent data) {
        switch (requestCode) {
            case REQUEST_CHECK_SETTINGS:
                switch (resultCode) {
                    case Activity.RESULT_OK:
                        //user said YES and GPS is enabled
                        startListeningLocationUpdates();
                        break;
                    case Activity.RESULT_CANCELED:
                        //user said NO and GPS is still disabled
                        textView.setText("GPS is still disabled.");
                        break;
                }
                break;
        }
    }


Step 4 - Stop listening to location updates once you have location.

If you want location only once then you can stop listening to location updates once you have location. Call following code whenever you want to stop listening to location updates -

 private void stopListeningLocationUpdates() {
        try {
            if (locationListener != null)
                locationManager.removeUpdates(locationListener);
        }
        catch (SecurityException e)
        {
            //do nothing
        }
    }


You can download working Android project from this link.  

This project asks request to enable GPS is not already enabled. Then it reads GPS co-ordinates. Once it has co-ordinates, it tries to get current city. Then it stop listening to location updates.
Following are the screenshots of this sample project -


Please feel free to comment below in case you have any doubts.


Wednesday, February 3, 2016

Calling Google Translation API in Java for free

The official Google translate API is available with a fee but there is a way using which you can call the API with free of cost. The trick is to make  a direct call to  secret translate.googleapis.com API that is internally used by the Google Translate extension for Chrome. Luckily  translate.googleapis.com API doesn't require any authentication. 

Following is the java code to call this API and get your word translation from any Google supported language to other language -


package default;

import java.io.BufferedReader;
import java.io.InputStreamReader;
import java.net.HttpURLConnection;
import java.net.URL;
import java.net.URLEncoder;
import org.json.JSONArray;

public class Translator {

 public static void main(String[] args) throws Exception 
 {

  Translator http = new Translator();
  String word = http.callUrlAndParseResult("en", "hi", "hello");
  
  System.out.println(word);
 }
 
 private String callUrlAndParseResult(String langFrom, String langTo,
                                             String word) throws Exception 
 {

  String url = "https://translate.googleapis.com/translate_a/single?"+
    "client=gtx&"+
    "sl=" + langFrom + 
    "&tl=" + langTo + 
    "&dt=t&q=" + URLEncoder.encode(word, "UTF-8");    
  
  URL obj = new URL(url);
  HttpURLConnection con = (HttpURLConnection) obj.openConnection(); 
  con.setRequestProperty("User-Agent", "Mozilla/5.0");
 
  BufferedReader in = new BufferedReader(
    new InputStreamReader(con.getInputStream()));
  String inputLine;
  StringBuffer response = new StringBuffer();
 
  while ((inputLine = in.readLine()) != null) {
   response.append(inputLine);
  }
  in.close();
 
  return parseResult(response.toString());
 }
 
 private String parseResult(String inputJson) throws Exception
 {
  /*
   * inputJson for word 'hello' translated to language Hindi from English-
   * [[["नमस्ते","hello",,,1]],,"en"]
   * We have to get 'नमस्ते ' from this json.
   */
  
  JSONArray jsonArray = new JSONArray(inputJson);
  JSONArray jsonArray2 = (JSONArray) jsonArray.get(0);
  JSONArray jsonArray3 = (JSONArray) jsonArray2.get(0);
  
  return jsonArray3.get(0).toString();
 }
}

You can download org.json jar from here.

If you are seeing garbage looking characters in output then you will have to set character encoding as "UTF-8" in your Java Project. This happens when output language is of unicode type. You can set character encoding from Project Properties -> Resource -> Text file encoding. Following is the screenshot to help you in this -


Please feel free to comment below if you have any doubts.

Thursday, January 28, 2016

Passing Parameters to FragmentPagerItem (SmartTabLayout) in Android

Following is how you can pass parameters to FragmentPageItem in SmartTablayout -

public class HomeActivity extends AppCompatActivity {

  @Override

  protected void onCreate(Bundle savedInstanceState) {

    super.onCreate(savedInstanceState);

    setContentView(R.layout.activity_demo);

 …

    ViewPager viewPager = (ViewPager) findViewById(R.id.viewpager);

 …
    FragmentPagerItems pages = new FragmentPagerItems(this);

    fragmentPagerItems.add(FragmentPagerItem.of("Tutorial", 
                 ContentFragment.class, ContentFragment.arguments("param1")));

    fragmentPagerItems.add(FragmentPagerItem.of("Programs", 
                 ContentFragment.class, ContentFragment.arguments("param2")));
 
    FragmentPagerItemAdapter adapter = new FragmentPagerItemAdapter(

        getSupportFragmentManager(), pages);

    viewPager.setAdapter(adapter);
 …
  }

}


Here is the relevant code for ContentFragment -

public class ContentFragment extends Fragment {


  //parameter to be passed
  private static final String KEY_PARAM = "key_param";


  public static ContentFragment newInstance(String param) {

    ContentFragment f = new ContentFragment();

    f.setArguments(arguments(param));

    return f;

  }


  public static Bundle arguments(String param) {

    return new Bundler()

            .putString(KEY_PARAM, param)

            .get();

  }
...

  @Override

  public void onViewCreated(View view, @Nullable Bundle savedInstanceState) {

    super.onViewCreated(view, savedInstanceState);


    //use KEY_PARAM here
   String paramValue = getArguments().getString(KEY_PARAM);
  } }

Thursday, February 5, 2015

Creating Android Style Navigation Drawer for Windows Phone 8.1

Let's learn how to create Android Style navigation bar for windows; following is how it will look on both the platforms -

Screenshot from Android Phone
Screenshot from Windows Phone

Let's start creating it step by step -


Step 1 - Install DrawerLayout Package -


  • Open Tools --> NuGet Package Manager --> Package Manger Console
  • Run command - Install-Package DrawerLayout
  • You will be able to see DrawerLayout in your project reference.


Step 2 - Open MainPage.xaml and add highlighted line in the code-


<Page
    x:Class="AptiApp.MainPage"
    xmlns="http://schemas.microsoft.com/winfx/2006/xaml/presentation"
    xmlns:x="http://schemas.microsoft.com/winfx/2006/xaml"
    xmlns:local="using:AptiApp"
    xmlns:d="http://schemas.microsoft.com/expression/blend/2008"
    xmlns:mc="http://schemas.openxmlformats.org/markup-compatibility/2006"
    mc:Ignorable="d"
    Background="{ThemeResource ApplicationPageBackgroundThemeBrush}"
    xmlns:drawerLayout="using:DrawerLayout">

<Grid>
<!-- Will be filled Later -->
</Grid>

</Page>


Step 3 - Now let's create actual navigation drawer-


<Page
    x:Class="AptiApp.MainPage"
    xmlns="http://schemas.microsoft.com/winfx/2006/xaml/presentation"
    xmlns:x="http://schemas.microsoft.com/winfx/2006/xaml"
    xmlns:local="using:AptiApp"
    xmlns:d="http://schemas.microsoft.com/expression/blend/2008"
    xmlns:mc="http://schemas.openxmlformats.org/markup-compatibility/2006"
    mc:Ignorable="d"
    Background="{ThemeResource ApplicationPageBackgroundThemeBrush}"
    xmlns:drawerLayout="using:DrawerLayout">
    <Grid x:Name="RootLayout">
        <Grid.RowDefinitions>
            <RowDefinition Height="Auto" />
            <RowDefinition Height="*" />
        </Grid.RowDefinitions>
        <!--Title bar -->
        <Grid x:Name="TitleBar" Background="#DDDDDD"  Grid.Row ="0" Height="60">
            <Grid.ColumnDefinitions>
                <ColumnDefinition Width="16" />
                <ColumnDefinition Width="*" />
            </Grid.ColumnDefinitions>
            <Image  x:Name="DrawerIcon"  Grid.Column="0" Source="/Assets/ic_drawer.png" HorizontalAlignment="Left" Tapped="DrawerIcon_Tapped" />
            <TextBlock Grid.Column="1" Text="Aptitude and Logical Reasoning" Foreground="Black" VerticalAlignment="Center" HorizontalAlignment="Center" FontSize="22"/>
        </Grid>
        <!--DrawerLayout bar -->
        <drawerLayout:DrawerLayout Grid.Row="1"  x:Name="DrawerLayout">
           <!--MainPage --> 
            <Grid x:Name="MainFragment" Background="White"> 
                <TextBlock Name="DemoTxtBlock" Text="No Item Tapped." Margin="10" HorizontalAlignment="Center" VerticalAlignment="Center" FontSize="25" Foreground="Black" /> 
            </Grid> 
            
            <!--Navigation Drawer Items -->
            <Grid x:Name="ListFragment" Background="#252424">
                <Grid.RowDefinitions>
                    <RowDefinition Height="Auto" />
                </Grid.RowDefinitions>
                <ListView Grid.Row="0" VerticalAlignment="Center" x:Name="ListMenuItemsDrawer" ItemsSource="{Binding}" 
                          HorizontalContentAlignment="Stretch" SelectionChanged="DrawerMenuItems_SelectionChanged"
                          ScrollViewer.VerticalScrollMode="Enabled" 
                         ScrollViewer.VerticalScrollBarVisibility="Visible">
                    <ListView.ItemContainerStyle>
                        <Style TargetType="ListViewItem">
                            <Setter Property="HorizontalContentAlignment" Value="Stretch"></Setter>
                        </Style>
                    </ListView.ItemContainerStyle>
                    <ListView.ItemTemplate>
                        <DataTemplate>
                            <Grid Background="#252424" Margin="0,0,0,1">
                                <Grid.ColumnDefinitions>
                                    <ColumnDefinition Width="50" />
                                    <ColumnDefinition Width="*" />
                                </Grid.ColumnDefinitions>
                                <Grid.RowDefinitions>
                                    <RowDefinition Height="75" />
                                    <RowDefinition Height="Auto" />
                                </Grid.RowDefinitions>
                                <Image Margin="5,5,5,5" Grid.Row="0"  Grid.Column="0" Source="{Binding Path=ListRowImg}" HorizontalAlignment="Left" />
                                <TextBlock  Grid.Row="0" Grid.Column="1" Text="{Binding Path=ListRowStr}" HorizontalAlignment="Left" VerticalAlignment="Center" FontSize="18" Foreground="White" />
                                <Border Height="2" Grid.Row="1"   Grid.Column="0"
                                        BorderBrush="White" 
                                        BorderThickness="2" />
                                <Border Height="2" Grid.Row="1"   Grid.Column="1"
                                        BorderBrush="White" 
                                        BorderThickness="2" />
                            </Grid>
                            
                        </DataTemplate>
                    </ListView.ItemTemplate>
                </ListView>
            </Grid>
        </drawerLayout:DrawerLayout>
    </Grid>
</Page>


Step 4 - Now write C# code for filling ListView of Navigation Drawer - 


public sealed partial class MainPage : Page
    {
        public MainPage()
        {
            this.InitializeComponent();

            List<MainPageListViewData> listViewSoure = listViewSoure = new List<MainPageListViewData>();
            listViewSoure.Add(new MainPageListViewData("/Assets/d_about_icon.png", "Aptitude"));
            listViewSoure.Add(new MainPageListViewData("/Assets/d_feedback_icon.png", "Logical Reasoning"));
            listViewSoure.Add(new MainPageListViewData("/Assets/d_verbal_ability_icon.png", "Verbal Ability"));
            listViewSoure.Add(new MainPageListViewData("/Assets/d_words_icon.png", "Top English Words"));
            listViewSoure.Add(new MainPageListViewData("/Assets/d_feedback_icon.png", "Other Topics"));
            listViewSoure.Add(new MainPageListViewData("/Assets/d_favourite_icon.png", "Favourite Questions"));
            listViewSoure.Add(new MainPageListViewData("/Assets/imp_website_icon.png", "Online Resources"));
            ListMenuItemsDrawer.ItemsSource = listViewSoure;           


            this.NavigationCacheMode = NavigationCacheMode.Required;  
        }


Step 5 - MainPageListViewData is a class to hold icon and text property of the Listview; its defined as -

namespace AptiApp.Data
{
    class MainPageListViewData
    {
        public MainPageListViewData(String listRowImg, String listRowStr)
        {
            this.listRowStr = listRowStr;
            this.listRowImg = listRowImg;
        }

        private String listRowImg = "";

        public String ListRowImg
        {
            get { return listRowImg; }
        }
        private String listRowStr = "";

        public String ListRowStr
        {
            get { return listRowStr; }
        }
    }
}


That's it; your Android Style Navigation Drawer is ready!!

Tuesday, September 25, 2012

TestNG-failed.xml and Optional Parameters


While debugging failures in some of the tests I came across one issue in TestNG Framework. The issue is related to optional parameters.

Problem Statement

Let me give an example to explain the issue.
Sample Test Class:
public class TestSampleAPI  extends TestBase
{
 @BeforeMethod
 @Parameters("BeforeTestParam")
 public void setUp(String param)
 {
 
 }
 
 @Test
 @Parameters ({"GlobalParam","number1", "number2", "result"})
 public void testAdd(String globalparam,int number1, int number2, @Optional String result)
 {
  Assert.assertEquals(0, 1);  //make sure that this test always fail.
 }
}
Sample XML File corresponding to above Test Class
<?xml version="1.0" encoding="UTF-8"?>
<suite name="Suite" verbose="1" parallel="tests" thread-count="10">
<parameter name ="GlobalParam" value="global" />
<parameter name="BeforeTestParam" value="testvalue" />
 
  <test name="Test1"  preserve-order="true">
        <parameter name="number1"  value="1"/>
 <parameter name="number2"  value="2"/>
 <parameter name="result"  value="3"/>
    <classes>
      <class name="test.TestSampleAPI"/>
      <methods>
        <include name="testAdd"/>
      </methods>
    </classes>
  </test>
 
   <test name="Test2"  preserve-order="true">
        <parameter name="number1"  value="1"/>
 <parameter name="number2"  value="3"/>
    <classes>
      <class name="test.TestSampleAPI"/>
      <methods>
        <include name="testAdd"/>
      </methods>
    </classes>
  </test> 
 
</suite>

When the above xml file is run as TestNG Suite; both the tests fail (for obvious reasons). Following is the testng-failed.xml file that is generated...
<?xml version="1.0" encoding="UTF-8"?>
<!DOCTYPE suite SYSTEM "http://testng.org/testng-1.0.dtd">
<suite thread-count="10" name="Failed suite [Suite]" parallel="tests">
  <parameter name="result" value="3"/>
  <parameter name="number2" value="3"/>
  <parameter name="number1" value="1"/>
  <parameter name="GlobalParam" value="global"/>
  <parameter name="BeforeTestParam" value="testvalue"/>
  <test name="Test1(failed)" parallel="tests" preserve-order="true">
    <parameter name="result" value="3"/>
    <parameter name="number2" value="2"/>
    <parameter name="number1" value="1"/>
    <parameter name="GlobalParam" value="global"/>
    <parameter name="BeforeTestParam" value="testvalue"/>
    <classes>
      <class name="test.TestSampleAPI">
        <methods>
          <include name="setUp"/>
          <include name="setUp"/>
          <include name="testAdd" invocation-numbers="0"/>
        </methods>
      </class>
    </classes>
  </test>
  <test name="Test2(failed)" parallel="tests" preserve-order="true">
    <parameter name="number2" value="3"/>
    <parameter name="number1" value="1"/>
    <parameter name="GlobalParam" value="global"/>
    <parameter name="BeforeTestParam" value="testvalue"/>
    <classes>
      <class name="test.TestSampleAPI">
        <methods>
          <include name="setUp"/>
          <include name="setUp"/>
          <include name="testAdd" invocation-numbers="0"/>
        </methods>
      </class>
    </classes>
  </test>
</suite>

Now look at the above xml file carefully; total 5 global parameters including the one which was optional !!
  <parameter name="result" value="3"/>  <!-- this was declared optional in one of the test Methods !! -->
  <parameter name="number2" value="3"/>
  <parameter name="number1" value="1"/>
  <parameter name="GlobalParam" value="global"/>
  <parameter name="BeforeTestParam" value="testvalue"/>

When this testng-failed.xml will be run as TestNG Suite (as is normally done to rerun failures), probably the tests which are assuming default value of optional parameter (i.e. the ones in which value of default parameter is not explicitly specified) will never pass as those tests will get some junk value from global parameters list.
For example in the above case, on rerun Test2 will take 'result' parameter value as '3' (i.e. <parameter name="result" value="3"/>), which might ultimately lead to failing this test again.

Possible Workaround

The workaround, that I am using currently, is to remove the list of global parameters from testng-failed.xml before running it as TestNG Suite. 
If interested, here is the complete implementation ...
public class FailedTestsXMLModification 
{
 /*
  * There is bug in TestNG which caused tests with optional parameters to fail when executed using
  * testng-failed.xml.
  * 
  * This method is targeted to resolve that bug; 
  */
 
 public static void main(String[] args)
 {
  if(args.length!=1)
  {
   System.out.println("Wrong number of arguments provided!!");
   System.out.println("Please provide path of tesng-failed.xml file.");   
   System.exit(1);
  }
 
  String path= args[0];  
 
     try
     {
      //reading testng-failed.xml file
      File file = new File(path);
      int ch;
      StringBuffer strContent = new StringBuffer("");
      FileInputStream fin = new FileInputStream(file);   
   while ((ch = fin.read()) != -1)
    strContent.append((char) ch);
   fin.close();  
     String content=strContent.toString();
 
     //use regular expression 
        content=content.replaceAll("(<suite.*>)\\s+(<parameter.*/>\\s+)*", "$1\r\n");
 
       //writing back in the testng-failed.xml file
        FileWriter fstream = new FileWriter(path);
        BufferedWriter out = new BufferedWriter(fstream);
        out.write(content);
        out.close();
     } 
     catch (FileNotFoundException e) 
     {
   e.printStackTrace();
  }
     catch (IOException e) 
     {
   e.printStackTrace();
  }
 }

This solution is working fine for TestNG 6.3.1 because in this version, a failed test carry list of all parameters (global and local both) that will be required for its execution (for all- @BeforeTest, @BeforeMethod,actual test, @AfterMethod, @AfterTest etc). The sample testng-failed.xml file I pasted above was generated by TestNG 6.3.1 only.
But this solution will not work with TestNG 6.7 as in this version, a failed test carry only list of local parameters but not of global parameters.